Wednesday, November 24, 2010

3 weeks in 1 (part 2)

i have also taken many photos as showen below next week will have steps on what we have done
straightening a stud with fish plates and wedge

roof gutter

finished building wrap for water and weather protection

how to cut building wrap for an opening

corner moldings used on the bottom corners of an opening

aluband used across the the whole bottom of an opening and up 200mm

aluband used at the top corners of an opening going out 200mm with butterfly 100mm x 50mm

ceiling battons on each side of opening from bottom of lintel to 100mm below floor

vernem strip along the house

vernem strip cut to allow for corners

packers and wedges used to help fit in windows

window temp fitted into opening

blocks set under window at 5 degrees and 50mm spacing

3 weeks in 1

due to assignments and other matters i have not been able to post my blog the last 2 weeks but i have all the videos below enjoy

Thursday, November 4, 2010

the sun is coming out 2


as i said before all these steps in constructing the roof are very important for example the perlins not only keep the trusses up but also keep them straight we do this by pushing against the truss before nailing the perlin to it with the use of marking out and tacing nails allows for the instalation of the perlins far easyer. other aspects of the roofing are showen in these photos  
shows how the gable end truss is smaller for the outrigger
hw to install the lowest perlin on the edge of truss
strap bracing crossing over truss and under perlin
nail tacked in for easy instalation of perlins
tencioner
trusses at the end of the week
nog installed to help hold strap bracing and later hold outrigger
installing nogs inbetween trusses
side view of house

clamp used to keep truss down to double top plate for nailing
cyclone strap to hold down the ends of the trusses
the perlins on the edges of the houses are diffrent because they cannot cross over the edge of the truss so we prevent this by using a straight edge (rule, square etc) and place it across the end of the truss as showen in the picture above and then nail the perlin in.
this week we also installed strap bracing at the back end of the house this helps keep the roofs strength and together we install them by running them diaganaly across a saction of the roof above the truss and below the perlin and then chisel out a grove for the ends and with the use of the correct product nails nail them in then to increse the tencile strength we use the tensioner as showen above

the sun is coming out

this week we worked mainly on the trusses and installing perlins, braces and straightening the trusses as showen in the videos below all of these steps are important in constructing a strong and straight roof and i will explain further in my next post

Wednesday, October 27, 2010

the roof work begins

also this week we finished off any frame work straps, butt joints etc
the straps are used to add resistance against wind uplift and help keep the roof to the frame and frame to the sub floor product nails are used and have 6 on top and 6 on the bottom of the strap
strap connecting frame to sub floor
also the roof trusses were delivered as showen in the videos below note: they are extremely long

the scaffolding is over

 
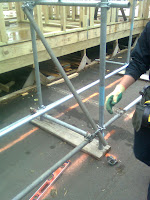
as the title says we finished scaffolding this week by placing put logs, planks, hand rails and stairs as showen in the picture and video below also not showen is we also had to cut pipes to make walking room between houses that is done with a tool that i do not know the name of but it clamps down on the pipe then is rolled around and cuts the pipe


scaffolding on side of house


Wednesday, October 20, 2010

the end of this week

the pictures below show how far we got at the and of the week with the scaffolding
an example of angle bracing

the back of the house

the side of the house our group did

mobile scaffolding inside the house
the last photo helps show the diffrence between mobile and fixed scaffolding while fixed is safer mobile is more conveniount and easyer to put together and take appart. the video is just a quick sum up of what i learned about scaffolding and what i may have missed in my last post.

scaffolding/heaps of work has begun

my last post on the house only talked about the 1st day the other two were spent on scaffolding collecting the required poles and conectors and that is very tiring but in a way also a good workout
there are many types of conectors used in scaffolding these are pictures of them
right angle cupling
swiveling cupling
jointer
interer jointer
first jointer used and the most common is the right angle cupling it is used to fix the vertical standard to the horrizontal ledger and the propper way to use it is with the claw holding the pipe if not installed that way dismantling the scaffold can be dangerous

next is the swiveling cupling that is used to help give horizontal resistance just as an angle brace would also it is weaker than a right angle cupling

then there is the jointer that extends pipes (standard and ledger) also the ends must fit in the grove like in the picture above
there is another type of jointer that is the interer jointer it is only used where it is impraticle to use a normal jointer due to other conectors etc because it is weaker than the normal jointer
also there are the half clips (i do not have a photo my bad) that are used to lock put logs to the ledger. some people also use them to lock the planks onto the put logs.

once we have everything we put it together we space the standard at about 2.4m length and 1.5m width and has ledgers at the bottom for bracing and then at every spot where putt logs and planks need to be placed then horizontal braces are placed widthwise between the standards after this is done we take the level and spacer to straighten the scaffolding and keep the correct spacing between pipes as showen below
using the spacer

using the level


important things to remember:
  • when the scaffolding is over 3m high you must have a top and mid rail and toe board on top of the planks
  • if over 5m high you must notify osh
  • always wear a hard hat on sight because there are many hazareds

quick house vid

this vid i made is just a quick sum up of whats going on with the house enjoy

the beginings of a roof

this week we continued with straightening the house with the stringlines and braces as showen below
bracing on top plate


bracing on bearer
 i also had to go to all the butt joints of the exteiour walls this is done by first clamping them together to get rid of any space between them an then they are nailed together then at some points at the bottom plate of the walls are marked where wind ties or straps are being placed. Next nogs are placed at those spots not to add structural strength but to purely hold the wind ties or straps.


while this was being done the others were installing the double top plates and ceiling battons for the back bedrooms the double top plates were cut at 320mm (not entirely sure on that) and nailed on the top plate with 25mm overhang if on inteirer walls also spacings were made for ceiling battons on inteirer walls exteirer on the other hand had no spaces and had to be butt joined all this is showen below

ceiling batton on ineirer wall
ceiling batton on exteirer wall

Thursday, October 14, 2010

another week another blog

we are back from our 2 week holiday and got back to the usual work on the house

this week we restraightend the walls through the bottom and top plates as well as the sub floor
the reason why we do this is because due to weather etc while we were gone the timber would have moved and maybe cuped so we fix this so that the house is straight as well as the walls so that the gib board fits flat without any problems

we straightin up the sub floor by simply using a clamp (showen below) to grab onto the boundry joist and the 2nd joist from it and it should line up with the BL (building line) showen by a string line and checked with doger blocks. also force by the use of a sledge helps
straighting up the boundry joist

we then straighten up the bottom and top plates by attaching string lines and use dodger blocks like with the boundry joist except this time we use braces as well as force and the tacking of nails i do not have a photo of these but will next week

Sunday, September 26, 2010

the walls are up

this week we put up the frames of the house

we do this by first marking around the edges of the house to show where the frames go for the edge
we then work from he back of the house to the front so it is easyer to carry the frames
the frames are numbered in accordance to the house plans and it is important we follow them to get maximum strength from the frames

the frames are conected by galv nails as well as conectors on the top as showen in this picture

we then brace them with cut timber to make sure they stay up
untill we are ready to load the roof on.
things to remember:

  • all the parts of the walls must be flush and leveled perfectly this can be made by braces, manual force through a sledge or normal hammer
  • when useing nails they must be galvz otherwise bright steel nails will rust and stain the floor
  • make sure to be safe with ladders as they can cause major harm if used incorrectly

Thursday, September 16, 2010

nail gun learning

these videos show of how we had to put in a nog so i went under the house and used the nail gun to put it on
i had to redo it because the nails did not hav enough grip and the wood fell out the last video shows a demo of the nail gun

partical board is up next

after the foil insulation is installed we next lay on the particle board which will finish the sub floor step in building the house. we installl them in a staggered formation as showen above to alow for even distrabution of weight throughout the joints. when instaling it is important to remember 2 things
  1. use the approite product nails an glue for the type of particle board used
  2. for wet areas you must use treated plywood as it will last longer than normal particale board also be sure to use the tongue provided for the plywood
  3.  be sure to wear old clothes because once the glue gets on it doesent get off
before be place the particle board on we must first apply glue to the joist on the cut out squares and mark out the joists on the particle board with a string line and apply glue to the edges that are going to connect at that moment

we then line the board up an push it in so that the board has a tight fit this is shown when there is no gap an glue is seeping out we can do this by applying pressure to the ends and tacking in nails to keep it there from there we nail the marked out areas and then continue until the floor is finished.

Wednesday, September 15, 2010

sunnys for foil continued


after we stapled the foil to the joistd we then cut squares onto the joist tho the spaces where the gorilla grip glue will be applyed for the particle board this is used with a knife

sunnys for foil


creating the 100mm sag

this week we installed the foil insulation for the house  this is important as it is used to stop moisture from entering the house and heat from exiting. the holes are what alow moisture to escape but we had to make more holes to ensuer its effectiveness. we also wore sunglasses because on a sunny day the light reflects off and can cause damage to the eyes. the foil is installed with staple guns on the joists and is cut to make space for the nogs wen stapled on the foil must hav a sag of 100m this is also to alow for the moisture to escape this is done with nailin peices of timber like in the picture.


Saturday, September 11, 2010

new site new blog

since vox is shuting down we hav all moved to blogger

well might as well get started
this week ive been sick so i waz only able to join in on the last day of work but htis is what i know
we worked on the nogs which run inbetween the joists where the walls will be for support in thoses areas
since each nog is diffrent we hav to measure an cut to exzactly the right size too small an it wont fit and too big will cause the joist to bend an loose structural strength.
we install them by measuring out the points on the joists where the nogs will go
we then measure an cut the nog to size an place it in, make it level with the joists then nail it in

we also installed trimming joists this makes space for drains etc
a few things to remember:
1) when using the joist holders we must use the correct product nails
2) when cutting its always better to be a bit larger than a bit shorter


trimming joist
joist hanger